


基础配置
openstack创建云主机Centos 7.2
将gpmall文件上传至/root目录
配置本地yum源
[root@mysql ~]# rm -rf /etc/yum.repos.d/CentOS-*
[root@mysql ~]# cat /etc/yum.repos.d/local.repo
[gpmall]
name=gpmall
baseurl=file:///root/gpmall/gpmall-repo
gpgcheck=0
enabled=1
数据库安装
yum安装数据库
[root@mysql ~]# yum install -y mariadb mariadb-server开启服务及初始化
[root@mysql ~]# systemctl start mariadb && systemctl enable mariadb
[root@mysql ~]# mysql_secure_installation
运维
创建数据库
create database [数据库名称];
MariaDB [(none)]> create database test;
Query OK, 1 row affected (0.000 sec)
查看数据库
show databases;
MariaDB [(none)]> show databases;
+--------------------+
| Database |
+--------------------+
| information_schema |
| mysql |
| performance_schema |
| test |
+--------------------+
4 rows in set (0.001 sec)
在数据库中创建表(需进入对应的数据库)
MariaDB [(none)]> use test;
Database changed
MariaDB [test]> create table company(tables_title varchar(100) not null, tables_author varchar(40) not null);
Query OK, 0 rows affected (0.008 sec)
查看数据库中的表(需进入对应的数据库)
show tables;
MariaDB [test]> show tables;
+----------------+
| Tables_in_test |
+----------------+
| company |
+----------------+
1 row in set (0.001 sec)
导出数据库
mysqldump -y[用户名] -p[密码] [数据库名称] > [导出后名称.sql]
[root@mysql ~]# mysqldump -uroot -p000000 test > test.sql导出数据库中的一个表
mysqldump -y[用户名] -p[密码] [数据库名称] [表名称] > [导出后名称.sql]
[root@mysql ~]# mysqldump -uroot -p000000 test company > test_company.sql删除数据库
drop database [数据库名称];
MariaDB [(none)]> drop database test;
Query OK, 1 row affected (0.009 sec)
导入数据库(两种方法)
创建数据库再导入SQL文件
[root@mysql ~]# mysql -uroot -p000000 -e "create database test;"
[root@mysql ~]# mysql -uroot -p000000 test < test.sql创建数据库后使用source导入SQL文件
MariaDB [(none)]> create test;
MariaDB [(none)]> use test;
Database changed
MariaDB [test]> source /root/test.sql
添加用户并授权
授权 root 用户可以在任何节点访问test数据库下所有表,%代表所有节点机器
MariaDB [(none)]> grant all privileges on test.* to 'root'@'%' identified by '000000';
Query OK, 0 rows affected (0.001 sec)
MariaDB [(none)]> grant all privileges on test.* to 'root'@'localhost' identified by '000000';
Query OK, 0 rows affected (0.001 sec)
添加 root 用户对test数据库授增、删、改、查的权限
MariaDB [(none)]> grant select,insert,delete,update on test.* to 'root'@'%' identified by '000000';
Query OK, 0 rows affected (0.001 sec)
数据库优化
修改配置文件/etc/my.cnf
#添加以下命令,优化数据库
[mysqld]
thread_concurrency = 64 #CPU 核数 * 2
max_connections=1500 #最大连接(用户)数。每个连接 MySQL 的用户均算作一个连接
max_connect_errors=30 #最大失败连接限制
bulk_insert_buffer_size = 32M #批量插入数据缓存大小
query_cache_type=1 #查询缓存 (0 = off、1 = on、2 = demand)
query_cache_size = 64M #指定 mysql 查询缓冲区大小
max_allowed_packet = 128M #通信缓冲大小
read_buffer_size = 8M #顺序读取数据缓冲区使用内存
read_rnd_buffer_size = 32M #随机读取数据缓冲区使用内存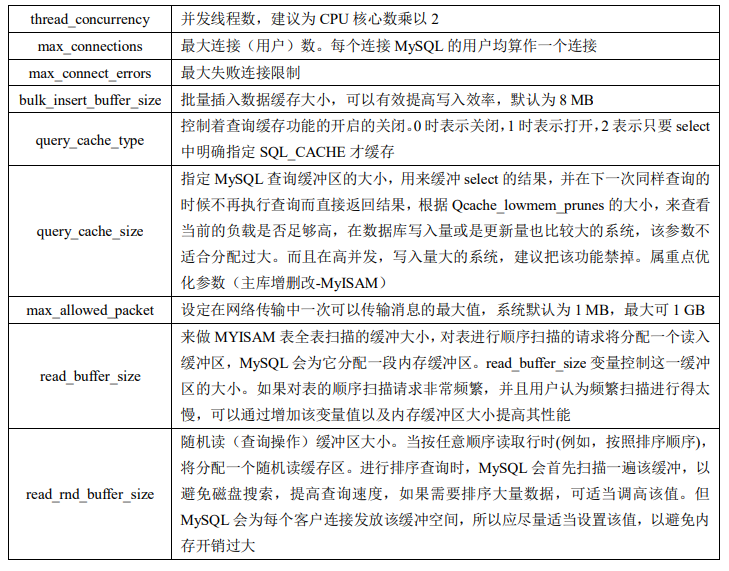
[/Warning]
设置数据库
调整数据库读取文件数目
修改配置文件/usr/lib/systemd/system/mariadb.service
/usr/lib/systemd/system/mariadb.service的[Service]添加一下内容LimitNOFILE=10000
LimitNPROC=10000
重新加载系统服务并重启服务
[root@localhost ~]# systemctl daemon-reload && systemctl restart mariadb修改数据最大连接数
#修改配置文件
#在/etc/my.cnf的[mysqld]添加一下内容:
max_connections=5000
#查询最大连接数
MariaDB [(none)]> show variables like 'max_connections';
+-----------------+-------+
| Variable_name | Value |
+-----------------+-------+
| max_connections | 5000 |
+-----------------+-------+
1 row in set (0.00 sec)
设置最大允许的 packet 为30M
#在/etc/my.cnf中的[mysqld]添加一下内容:
max_allowed_packet=31457280 # 此数值单位为:B
#重启服务
systemctl restart mariadb
MariaDB [(none)]> show variables like 'max_allowed_packet%';
+--------------------+----------+
| Variable_name | Value |
+--------------------+----------+
| max_allowed_packet | 31457280 |
+--------------------+----------+
1 row in set (0.00 sec)
Comments NOTHING